· FabLab Westharima Team · Laser Cutter · 4 min read
xTool P2S 55W Introduction Review | Purchase, Setup, and Impressions
Graduated from an old laser cutter used for about 8 years and newly introduced the xTool P2S 55W. Honest review covering what I purchased, setup process, test results, and actual pros and cons.
xTool P2S 55W Introduction Review | Purchase, Setup, and Impressions
I graduated from an old laser cutter used for about 8 years and newly introduced the xTool P2S 55W. This article covers what I purchased, the setup process, test results, and honest impressions of the pros and cons.
📖 For detailed operation procedures: → xTool P2S 55W Basic Operation Manual
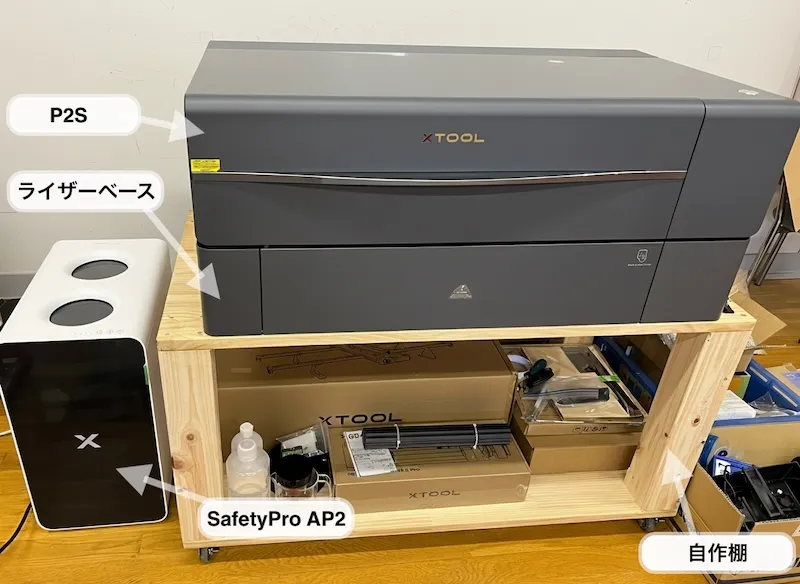
Purchase List
🔹Automatic Conveyor Feeder (automatic material processing)
🔹P2 Riser Base (enables processing of thicker/larger objects)
SafetyPro AP2 (Air purifier with Super Cyclone system)
(🔹purchased as a set from official site. Other 2 items purchased later)
Initial Setup Process
Referring to the included Machine Usage Manual and Quick Start Guide, I performed the following:
- Unboxing, operation check, damage inspection
- Coolant filling
- Power connection
- Exhaust pipe attachment
📖 xTool - Manual Download Page
Important note during setup: The main unit weighs 45kg, so installation by multiple people is recommended.
About Safety Measures
Laser cutters are convenient tools, but using them incorrectly can lead to fire and health hazards.
📖 For detailed safety information: → Safe Use of Laser Cutters | Basic Rules to Prevent Fire and Accidents
Test Processing and Results
I performed a test to engrave and cut text on Plywood 3mm.

Test Conditions
- Material: Plywood Thickness 3mm
- Parameters used: Default for (3mm) Pine Ponderosa Plywood
| Mode | Power | Speed | Passes | Engraving Density | Engraving Mode |
|---|---|---|---|---|---|
| Engraving | 15% | 400mm/s | 1 | 100 | Bidirectional |
| Cutting | 60% | 15mm/s | 1 | - | - |
Results and Impressions
Cutting: Cut completely. Could lower power a bit.
Engraving: Light engraving. Parameters used are only for similar products, so that may have influenced it.
- Cause: Plywood surface may have been hard
- Improvement plan for next time:
- Increase power from 15% → 20%
- Or increase passes from 1 → 2
- Increase engraving density from 100 → 300 (Max)
Errors and Learnings
Here are the errors that occurred and points learned.
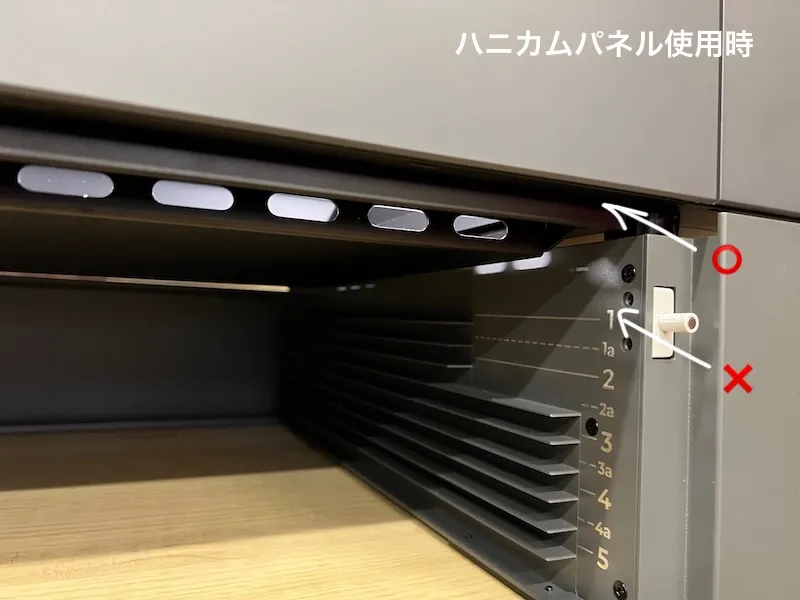
Honeycomb Panel Installation Error
- Error that occurred: “Confirm honeycomb panel is installed correctly” was displayed and processing couldn’t start.
- Cause: Mistakenly installed the bottom support that should be attached to the bottom tier of P2S main unit at the top of the riser base.
- Analysis: Main unit side couldn’t detect installation of bottom support shelf, resulting in error.
- Solution: By reinstalling bottom support correctly to bottom tier of P2S main unit, processing became normal.
⚠️ When returning to honeycomb panel after using riser base, please be very careful about bottom support installation location.
Usage Review: Good Points and Concerns
Honest evaluation of feelings after actually using P2S.
| Item | Points/Impressions |
|---|---|
| Software (xTool Studio / Formerly: xTool Creative Space) | - Intuitive and easy-to-use interface - Material parameters seem somewhat strong - English notation makes material search somewhat time-consuming |
| Work Area (Processing Range) | - Width is sufficient, 300mm depth feels somewhat narrow - Wish it could support larger sizes - Conveyor feeder support is major advantage, but installation space needed - Upper P3 has wider depth but high price |
| Wi-Fi Connection | - Connection becomes unstable sometimes (depends on Wi-Fi environment quality) |
| Installation | - Main unit weighs 45kg, installation by multiple people recommended |
| Camera Function | - Works comfortably with flat materials with little unevenness - Requires ingenuity for fine position adjustment - Difficult to grasp position when rotary is set |
| Processing Performance | - Transparent acrylic: Cuts cleanly - Wood: Good but requires adjustment of burning degree |
Overall Evaluation and Points for Consideration
P2S 55W is a powerful and versatile laser cutter, but introduction is desirable when the following environment is ready.
| Item | Points |
|---|---|
| Budget | Investment in peripheral equipment (air purifier, etc.) needed in addition to main unit |
| Work Space | At least 1.5m × 1m work space needed in front. When using riser base, even more space needed |
| Ventilation | Can clean air with SafetyPro AP2, but concurrent use with ventilation fan essential |
| Purpose | For those who want to seriously enjoy laser cutting |
⚠️ When making a stand for P2S + riser base, recommend adopting casters with locks
Recommended Materials and Consumables
Processing Materials
- Plywood Thickness 3mm
- Acrylic Board 3mm Thick (Transparent)
- Leather Craft Parts + Leather Craft Kit Tools 39-piece Set
- Blank Wooden Keychain (Round)
- Blank Wooden Keychain (Rectangle)
- Blank Wooden Keychain (Drop Shape)
Material Fixing and Resin Prevention
Summary
xTool P2S 55W is a very powerful and versatile tool.
Points for those considering introduction:
- Always confirm safety measures - Basic rules to prevent fire and accidents
- Secure work space and ventilation environment - Takes more space than expected
- Adjust material parameters while experimenting - Official settings seem strong
I want to start with simple Plywood processing and accumulate experience.