Airbrush Basic Operation Manual
Required Tools
Essential Tools
| Tool | Description |
|---|---|
| Airbrush (Handpiece) | “Double action” type recommended for beginners |
| Compressor | Tank-equipped ideal. Beginners can start with air cans |
| Airbrush Stand | Safely holds airbrush with paint in cup |
Beginner Set: GSI Creos Mr. Linear Compressor L7 Regulator/Platinum Set
Paint
| Tool | Description |
|---|---|
| Paint | Lacquer or acrylic paints are common |
| Paint Thinner (Solvent) | Always use thinner from same manufacturer as paint |
Tools for Comfortable Work
| Tool | Description |
|---|---|
| Part Holders | DIY with clips, chopsticks, wire |
| Drying Stand | Holds parts without touching painted surface |
| Pipette | For measuring paint and thinner |
| Mixing Dish | Container for mixing paint and thinner |
| Stirring Rod | For mixing paint evenly |
Safety & Protection
| Tool | Description |
|---|---|
| Mask (Respirator Recommended) | Organic solvent respirator essential for lacquer paints |
| Nitrile Gloves | Change for each color to prevent mixing |
| Apron or Work Clothes | Protect clothing from stains |
| Old Newspaper | Protect work surface, use for test spraying |
| Paper Towels | Wipe spills, clean tools |
Safety Precautions
| Precaution | Details |
|---|---|
| No Open Flames | Lacquer paints are flammable. Strictly prohibit fire in work area |
| Adequate Ventilation | Paint mist and solvent vapor are harmful. Open windows or use spray booth |
Setup Procedure
- Spread old newspaper on work desk
- Assemble airbrush
- Prepare compressor and materials
- Connect airbrush to compressor with hose
- Turn compressor power ON
3 Principles of Painting
1. Paint Dilution
Basic Ratio: For lacquer paint Paint 1 : Thinner 3
| State | Symptoms | Solution |
|---|---|---|
| Proper | Fine mist, thin smooth finish | Use as is |
| Too Thick | Large droplets, cotton-like clumps, bumpy surface, nozzle clogging | Add thinner |
| Too Thin | Color won’t adhere, slow drying, needs multiple coats | Add paint |
2. Spray Distance
Basic Distance: ~10cm (4 inches)
| Distance | State | Result |
|---|---|---|
| Under 3cm (too close) | Paint concentrates, drips | Prone to failure |
| ~10cm (basic) | Even, beautiful finish | Minimal unevenness |
| Over 15cm (too far) | Paint dries before landing | Rough surface |
3. Air Pressure Adjustment
Basic Pressure: 0.1-0.15 MPa
- Beginners start with low pressure (~0.1 MPa)
- Low pressure/dilution gives weak color but easy recovery from mistakes
Painting Procedure
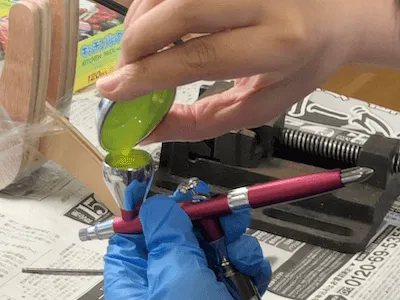
STEP 1: Prepare Paint
- Stir paint: Mix pigment settled at bottom
- Add paint and thinner to mixing dish: Paint 1 : Thinner 3 ratio
- Mix thoroughly: Until completely uniform
- Pour into airbrush cup: Fill about halfway
- Clean up immediately: Wipe container rim, close lid
- Close paint cup lid: Place on stand

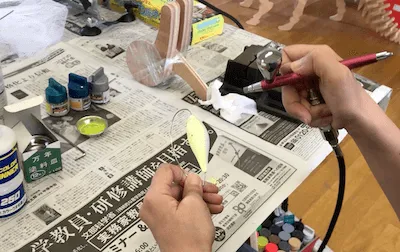
STEP 2: Test Spray and Adjust
- Close adjustment screw completely first
- Gradually open adjustment screw
- Test spray on old newspaper
- Fine-tune dilution and air pressure
Points:
- Maintain ~10cm distance between nozzle and target
- Return to STEP 1 if dilution is incorrect
STEP 3: Main Painting
| Technique | Description |
|---|---|
| Maintain consistent distance | Always ~10cm. Too close = drips, too far = rough |
| Start spray outside the part | Begin mist outside target, move naturally onto it |
| Keep paint cup level | Always hold airbrush horizontal |
| Mind overall balance | Don’t focus on one spot, check entire piece |
| Check in natural light | Colors appear different under various lighting |
| Don’t touch until dry | Hold with drying stand or wire hooks |
When Changing Colors:
- Place airbrush on stand
- Change to new gloves (prevent mixing)
- Clean airbrush
Troubleshooting
| Problem | Main Causes | Solutions |
|---|---|---|
| Paint Drips | Distance too close, spraying same spot, moving too slow | Keep 10cm+ distance, move at steady speed, apply thin coats |
| Rough Surface | Paint too thick, distance too far, pressure too high | Add thinner, adjust to ~10cm, lower pressure |
| Nozzle Clogging | Paint too thick, dried paint, insufficient cleaning | Dilute properly, flush regularly, always clean after use |
Cleaning and Maintenance
| Method | Timing | Procedure | Time |
|---|---|---|---|
| Flush Cleaning | Color change, work breaks | 1. Transfer remaining paint 2. Add thinner to cup 3. Spray a few times 4. Wipe with tissue | ~1-2 min |
| Full Disassembly | End of day, dark to light color, long storage | 1. Disassemble parts 2. Clean with thinner 3. Use brush for details 4. Dry and reassemble | ~5-10 min |
Checklist
| Item | Points |
|---|---|
| Preparation | Safety (no flames, ventilation), plan paint scheme, gather all tools |
| 3 Principles | Dilution: Paint 1 : Thinner 3, Distance: ~10cm, Pressure: 0.1-0.15 MPa |
| Techniques | Always test spray, apply thin multiple coats, don’t spray one spot too long |
| Maintenance | Flush when changing colors, full clean end of day, don’t let paint dry |