· FabLab Westharima Team · DIY · 10 min read
Complete Airbrush Guide | From Basics to Application for 3D Printing & Model Painting
Thorough explanation of airbrush usage that even beginners can master. A complete guide to achieving beautiful painting, from necessary tools, 3 basic principles of painting, to troubleshooting common problems.
Have you ever wanted to apply professional-quality beautiful painting to the finishing of 3D printed works or DIY projects? With an airbrush, you can achieve uniform painting without unevenness and delicate gradation expressions.
When I first used an airbrush myself, there was a lot to remember and it was a continuous source of tension. Therefore, for future reference and for those who will challenge airbrushing, I systematically compiled everything from necessary tools to actual usage methods and tips to avoid failure.
What is an Airbrush
An airbrush is a painting tool that mixes compressed air sent from a compressor with paint inside a handpiece, creating a fine mist and spraying it onto the target object. It realizes a thin and uniform paint film that is difficult with brush painting, enabling diverse expressions from fine lines to wide surface painting with a single device.
It particularly demonstrates power in the following applications:
- Finishing painting of 3D printed works
- Full painting of plastic models and Gunpla
- Painting of fishing lures
- DIY craft painting
Tools and Materials Needed for Airbrushing
To start airbrushing, several tools are necessary. Here I’ll introduce everything from essentials to convenient items, organized by priority.

Essential Tools (Absolutely Necessary)
| Tool Name | Description |
|---|---|
| Airbrush Body (Handpiece) | Main body for spraying paint. “Double action” type is recommended for beginners. You can adjust air volume by pressing depth and paint volume by pulling, enabling fine expressions. |
| Compressor | Device that creates compressed air. One with a tank that can supply stable air pressure is ideal, but beginners can also start with air cans. |
| Airbrush Stand | Used to safely place the airbrush when temporarily suspending work or when the paint cup has paint in it. Reduces worry about spilling paint and frees both hands. |
Beginner Set
- Recommended: GSI Creos Mr. Linear Compressor L7 Regulator/Platinum Set Hobby Painting Tool PS309
- Reference price range: Approx. 56,000-65,000 yen
- Set contents:
- Mr. Linear Compressor L7
- Procon BOY WA Platinum ver.2 (top-grade airbrush)
- Air Regulator (with pressure gauge)
- Drain & Dust Catcher
- Mr. Stand & Tray Set II
- Mr. Air Hose
Paint
| Tool Name | Description |
|---|---|
| Paint | Prepare paint suitable for your work. Lacquer paint and acrylic paint are common for plastic models and 3D printed works. |
| Paint-specific Thinner (Solvent) | Necessary to dilute paint to proper consistency. Always use dedicated thinner from the same manufacturer as the paint. |
Tools That Make Work Comfortable
| Tool Name | Description |
|---|---|
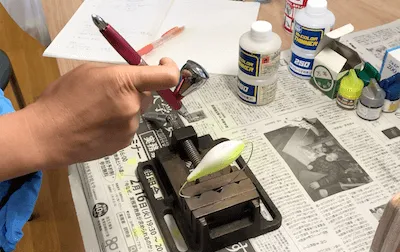
| Handle for Painting Parts | If you hold the painting object directly by hand, your hands get dirty or the held part cannot be painted. Often self-made with clips, chopsticks, wire, etc. |
| Painting Base (Drying Stand) | Tool for holding parts without the painted surface touching anything during paint drying. Vises or wire hooks can be used. |
| Pipette | Convenient for accurately measuring paint and thinner. Can maintain consistent dilution ratios. |
| Palette Dish (Mixing Dish) | Container for mixing paint and thinner. Ceramic ones are easy to use and simple to wash. |
| Mixing Stick | Stick for uniformly mixing paint. Bamboo skewers or plastic sticks are common. |
Safety Measures & Stain Prevention Supplies
| Tool Name | Description |
|---|---|
| Mask (Gas Mask Recommended) | Essential to prevent inhalation of paint mist. Especially when using lacquer paint, organic solvent gas mask is strongly recommended. |
| Nitrile Gloves | Prevents hand stains. Change for each color to prevent color mixing, so prepare multiple pairs. |
| Apron or Work Clothes | To prevent clothing stains, wear an apron over clothes that can get dirty. |
| Old Newspapers | Spread on work desk to prevent stains. Also used for test spraying. |
| Kitchen Paper | Used for wiping spilled paint and cleaning tools. |
Preparation Before Airbrush Painting
Thoroughly Implement Safety Measures
Before starting airbrush painting, always follow these two points.
| Precaution | Details |
|---|---|
| No Open Flames | Since flammable liquids like lacquer paint are used, completely prohibit open flames in the work area. |
| Thorough Ventilation | Paint mist and solvent vapors are toxic. Always open windows or use a painting booth to ensure sufficient ventilation. |
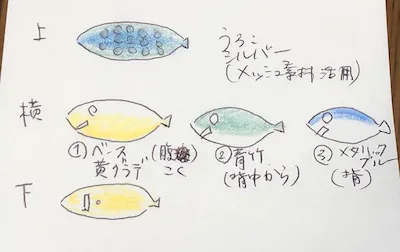
Create a Painting Image
Starting painting suddenly is likely to fail, so plan your painting in advance.
| Step | Details |
|---|---|
| 1. Shape Sketch | Simply draw the object shape from multiple angles (top, side, bottom, etc.) |
| 2. Decide Colors | List the colors to be used |
| 3. Decide Painting Areas | Color-code the sketch indicating which color goes where |
| 4. Decide Painting Order | Basically paint in order of “light colors → dark colors”. For gradations and pattern expressions, devise the order |
Tips for Creating Painting Images
- Basically, starting with weak coverage colors (light colors) is the standard, but it’s also important to adjust the order by working backwards from the finished image.
- Making the undercoat painting area wider than the finished range makes gradation expressions easier.
- It’s also important to respond flexibly during actual work.
Setup Procedure
- Spread old newspapers on work desk
- Assemble the airbrush
- Prepare compressor and necessary materials
- Connect airbrush and compressor with hose
- Turn ON compressor power
Three Basic Principles of Airbrush Painting
To achieve beautiful painting finish, it’s important to understand and properly adjust the following three elements.
1. Paint Dilution Consistency
Paint must always be diluted with thinner before use. Various troubles occur if not adjusted to proper consistency.
Basic Dilution Ratio
- For lacquer paint: Paint 1: Thinner 3 is the guideline.
- However, adjustment is needed depending on the original paint consistency.
Differences by Dilution Consistency
| State | Phenomenon | Action |
|---|---|---|
| Proper Consistency | - Fine mist creates beautiful gradations. - Paint colors appear clearly. - No unevenness on painted surface, finishes beautifully with thin paint film. | Use as is |
| Too Thick | - Large paint mist appears. - Cotton-like clumps occur. - Paint film becomes bumpy. - Continuing to paint with thick consistency easily causes nozzle clogging. | Add thinner |
| Too Thin | - Colors don’t apply well. - Difficult to dry. - Multiple coats needed. | Add paint |
2. Spraying Distance
The distance between the airbrush nozzle tip and the painting target greatly affects the painting finish.
| Distance Guideline | State & Finish Characteristics | Main Advantages & Disadvantages |
|---|---|---|
| Less than 3cm (too close) | Paint concentrates easily, causing drips | Easy to fail, creates uneven painting and flow marks |
| Around 10cm (basic distance) | Uniform and beautiful finish, paint spreads appropriately | Few unevenness, easy to make fine adjustments |
| 15cm or more (too far) | Paint arrives while drying, surface becomes rough | Not suitable for uniform painting, suitable for gradations and special expressions |
Point
- Basic is “about 10cm”. At this distance, you can paint evenly and prevent drips and roughness.
- Finish texture can also be controlled by adjusting distance.
3. Air Pressure Adjustment
The pressure of air sent from the compressor is also an important element that affects painting quality.
Basic Pressure: 0.1-0.15MPa (megapascals)
For beginners, it’s recommended to start from low pressure (around 0.1MPa) and gradually adjust. Low pressure, low concentration painting has weak color development, which has the advantage of being easy to recover even if you fail.
Actual Painting Procedure
Now, I’ll explain the actual painting procedure step by step.
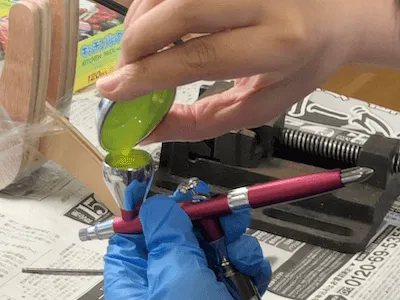
STEP 1: Paint Preparation
Stir the paint Since pigment has settled to the bottom of the container, mix well with a stirring stick.
Put paint and thinner in palette dish Using the guideline of paint 1: thinner 3 ratio, pour slowly along the stirring stick to prevent spilling.

Mix thoroughly Mix with stirring stick until completely uniform.
Put into airbrush paint cup Keep the amount to about half the paint cup to avoid overflow worries.
Clean up immediately
- Wipe the edge of the paint container with tissue and close the lid tightly (to prevent lid sticking).
- Also wipe the palette dish and stirring stick clean.
- Close paint cup lid Place airbrush on stand.
STEP 2: Test Spray and Adjustment
Before actual painting, always test spray and adjust the airbrush condition.
First close adjustment screw tightly
Open adjustment screw little by little
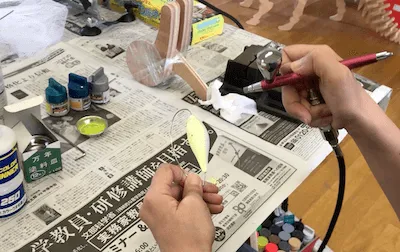
Test spray toward old newspapers or waste materials Press trigger (push button) and gradually pull to check paint mist amount and spread.
Fine-tune paint dilution and air pressure While checking mist particle fineness and color density, thin paint or change air pressure as needed. Repeat several times until satisfactory spray is achieved.
Points
- Always maintain about 10cm distance between airbrush outlet and target object
- If dilution consistency is not appropriate, return to STEP 1 and adjust
STEP 3: Actual Painting
Once test spray adjustment is complete, enter actual painting.
Basic Painting Techniques
| Technique | Description |
|---|---|
| Maintain constant distance | Always maintain about 10cm distance. Too close causes drips, too far causes roughness. |
| Start painting from outside parts | Start mist outside the target and move naturally onto it (prevents sudden application). |
| Don’t tilt paint cup | Tilting too much causes paint leakage, so be careful. Always keep airbrush horizontal. |
| Be conscious of left-right symmetry & overall balance | Work while viewing the entire piece. Don’t concentrate on one spot, check overall finish while working. |
| Check in natural light too | Check colors not only under fluorescent lights but also in natural light. Colors appear different depending on light source. |
| Don’t touch painted surface until dry | Don’t let it contact anything until dry. Hold with painting base or wire hooks. |
Points When Changing Colors
| Work | Purpose |
|---|---|
| Place on airbrush stand | To work safely using both hands |
| Change to new gloves | To prevent color mixing |
| Clean airbrush | To prevent previous color from mixing (see cleaning section for details) |
Common Failures and Solutions
Here are common failures beginners fall into and their solutions. Refer to this when troubles occur.
| Failure Example | Main Causes | Solutions |
|---|---|---|
| Dripping occurs | ・Airbrush and target distance too close ・Continuing to spray paint on same spot ・Airbrush movement too slow | ・Maintain distance of 10cm or more ・Keep moving at appropriate speed ・Don’t paint thick at once, layer thinly |
| Painted surface is rough | ・Paint too thick ・Spraying distance too far ・Air pressure too high | ・Add thinner to dilute ・Adjust distance to around 10cm ・Lower air pressure |
| Nozzle clogs | ・Paint too thick ・Paint has dried ・Insufficient cleaning | ・Dilute properly (guideline: paint 1: thinner 3) ・Periodically gargle clean during work ・Always clean after use |
Cleaning and Maintenance
If you neglect airbrush cleaning, paint will harden in the nozzle and needle, making it unusable. Always clean after use.
There are two types of cleaning methods, used depending on the situation.
| Cleaning Method | Implementation Timing | Procedure | Time Required |
|---|---|---|---|
| Gargle Cleaning (Simple Cleaning) | ・When changing colors ・During work breaks ・Before paint dries | 1. Transfer remaining paint from paint cup to separate container 2. Put thinner or tool cleaner in cup 3. Spray several times toward old newspapers (gargle it) 4. Wipe cup with tissue | About 1-2 min |
| Disassembly Cleaning (Thorough Cleaning) | ・When changing from dark to light colors ・At end of day’s work ・Before using after long time ・When not using for long period ・When heavily soiled | 1. Disassemble airbrush into parts 2. Clean each part with thinner or tool cleaner 3. Use dedicated brush for detailed parts 4. Reassemble after completely dry | About 5-10 min |
Cleaning Points
- Gargle cleaning: Simple, quick to complete. Optimal when repainting similar colors.
- Disassembly cleaning: Can thoroughly clean. Prevents paint clogging, essential before long-term storage.
Summary: Points Beginners Should Be Careful Of
Let’s review the important points for successful airbrush painting.
| Item | Points |
|---|---|
| Preparation Stage | ・Prioritize safety measures (no open flames, ventilation) ・Plan painting image in advance ・Gather all necessary tools |
| 3 Principles of Painting | ・Dilution consistency: Adjust based on paint 1: thinner 3 ・Spraying distance: Maintain about 10cm ・Air pressure: Start from 0.1-0.15MPa |
| Practical Techniques | ・Always test spray ・Layer thinly multiple times ・Don’t spray same spot for long time |
| Maintenance | ・Always gargle clean when changing colors ・Disassembly clean at end of day ・Don’t let paint dry |
Impressions
Airbrushing has many processes and many points to be careful of, so at first it was a continuous source of tension. Adjusting mist amount and dilution consistency often feels difficult when you actually try it.
However, as you get used to it, you can achieve beautiful gradations and uniform painting that are utterly impossible with brush painting, and work quality improves dramatically. For finishing 3D printed works and DIY projects, airbrushing is a very powerful tool.
At first, don’t be afraid of failure, and practicing with test spraying is the shortcut to improvement. I hope this article helps with your airbrush challenges.
!['[2025 Edition] Complete Soldering Guide for Electronics | Basics and Tips Even Beginners Won't Fail'](/_astro/soldering_guide_eyecatch.DghrOCBg.png)