· FabLab Westharima Team · Documentation · 11 min read
Visual Studio Code Complete Guide: From Installation to Practice (2025 Edition)
A beginner-friendly guide to VSCode covering installation, Japanese language setup, recommended extensions, keyboard shortcuts, and AI integration features for 2025.
What tools do you use for document creation and everyday tasks? For a long time, I only used simple note-taking features. However, since I started using Visual Studio Code (VSCode), a full-fledged editor, my work efficiency has changed dramatically.
This article provides a beginner-friendly guide to VSCode, from installation to practical use, based on the latest information as of October 2025. It’s a powerful tool that can be used not only for programming and web development but also for document creation in Markdown.
What is Visual Studio Code?
Visual Studio Code (VSCode) is a free code editor developed by Microsoft. Its greatest feature is being “free yet highly functional,” earning overwhelming support from developers worldwide.
5 Reasons Why VSCode is Chosen
- Completely Free: All features are free to use, including for commercial purposes
- Lightweight and Fast: Quick startup and smooth operation even with large files
- Rich Extensions: Over 60,000 extensions for customization to your liking
- Multi-platform: Works on Windows, Mac, and Linux
- Active Community: Abundant information when you need help, making solutions easy to find
What I particularly like is the code completion feature when writing HTML or Markdown. It suggests candidates as you type, significantly reducing typos. Furthermore, using the Code Spell Checker extension provides real-time spell checking, preventing mistakes in English words.
Installation Method (Time Required: About 5 Minutes)
For Windows
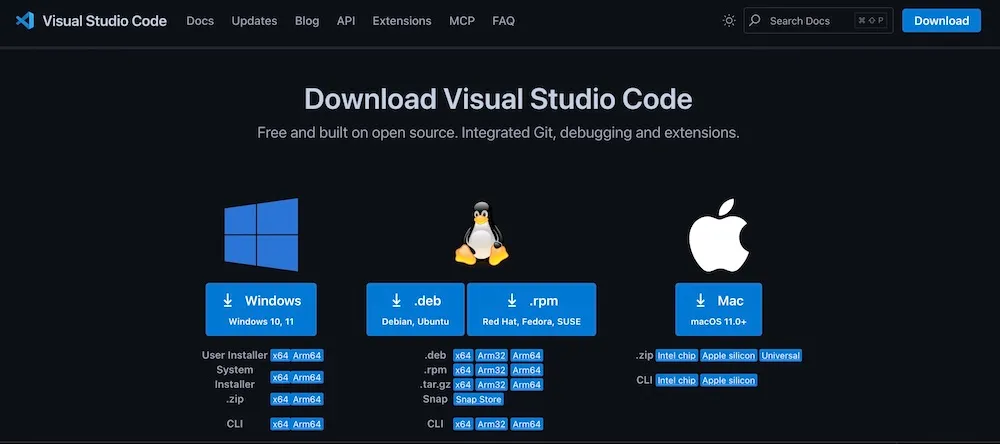
- Access the VSCode Official Site
- Click the “Download for Windows” button
- Run the downloaded
VSCodeUserSetup-x64-x.xx.x.exe - When the setup wizard starts, click “Next”
- Agree to the license agreement and click “Next”
- Important: On the “Select Additional Tasks” screen, we recommend checking the following:
- ☑ Create a desktop icon
- ☑ Add “Open with Code” action to Windows Explorer file context menu
- ☑ Add “Open with Code” action to Windows Explorer directory context menu
- ☑ Register Code as an editor for supported file types
- Click the “Install” button
- After installation completes, check “Launch Visual Studio Code” and click “Finish”
Tip: Adding to the context menu allows you to right-click a folder and select “Open with Code,” which is very convenient.
For Mac
- Access the VSCode Official Site
- Click the “Download for Mac” button (automatically detects Apple Silicon/Intel)
- Extract the downloaded
VSCode-darwin-universal.zip - Drag and drop the extracted
Visual Studio Code.appto the “Applications” folder - Launch “Visual Studio Code” from Launchpad or the Applications folder
Mac-specific setup: If the first launch shows “Cannot be opened because the developer cannot be verified,” right-click (or Control + click) → “Open” to launch it.
Initial Setup: Japanese Language Support (Essential)
VSCode displays in English immediately after installation. The Japanese language setup is simple and takes about 1 minute.
- Launch VSCode
- Click the “Extensions” icon (four squares overlapping) in the activity bar on the left
- Shortcut: Windows
Ctrl + Shift + X/ Mac⌘ + Shift + X
- Shortcut: Windows
- Type “Japanese” in the search bar
- Find “Japanese Language Pack for Visual Studio Code” (Publisher: Microsoft) and click “Install”
- A “Change Language and Restart” button will appear in the bottom right, click it
- VSCode will restart and display in Japanese
If the button doesn’t appear, manually restart and it will be in Japanese.
Understanding the VSCode Interface
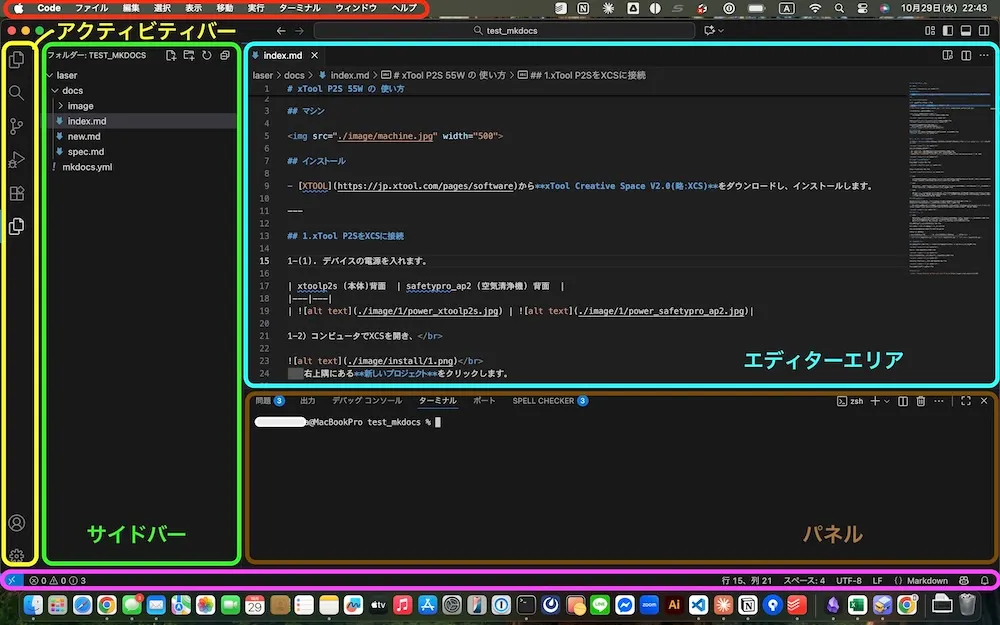
When you open VSCode, it may seem complex at first, but once you learn the basic structure, you’ll get used to it quickly.
Main Interface Elements
1. Menu Bar (Top) Standard menus like File, Edit, View are lined up.
2. Activity Bar (Vertical Bar on the Left) Quick access to main features:
- Explorer: File and folder management
- Search: Search strings throughout the project
- Source Control: Version control with Git
- Run and Debug: Program execution and debugging
- Extensions: Plugin management to add features
3. Side Bar (Next to Activity Bar) Displays the content selected in the activity bar.
4. Editor Area (Large Central Area) Where you actually write code. You can open multiple files with tabs.
5. Panel (Bottom) Displays terminal, output, problems, debug console, etc.
- Toggle visibility: Windows
Ctrl + J/ Mac⌘ + J
6. Status Bar (Bottom) Displays current status:
- Line and column numbers
- Character encoding (UTF-8, etc.)
- Line endings (LF, CRLF, etc.)
- File format (HTML, Markdown, etc.)
- Git information (branch name, etc.)
Useful Keyboard Shortcuts
You don’t need to memorize all of them from the start, but knowing even these shortcuts will significantly improve your work efficiency.
Basic Operations
| Function | Windows | Mac |
|---|---|---|
| Open command palette | Ctrl + Shift + P | ⌘ + Shift + P |
| Open file | Ctrl + O | ⌘ + O |
| New file | Ctrl + N | ⌘ + N |
| Save | Ctrl + S | ⌘ + S |
| Save all | Ctrl + K S | ⌘ + K S |
| Close | Ctrl + W | ⌘ + W |
View Toggle
| Function | Windows | Mac |
|---|---|---|
| Toggle sidebar | Ctrl + B | ⌘ + B |
| Toggle panel | Ctrl + J | ⌘ + J |
| Toggle terminal | Ctrl + @ | ⌃ + @ |
Editing Operations
| Function | Windows | Mac |
|---|---|---|
| Copy line | Shift + Alt + ↓ | Shift + Option + ↓ |
| Move line | Alt + ↑/↓ | Option + ↑/↓ |
| Multi-line select | Ctrl + Alt + ↑/↓ | ⌘ + Option + ↑/↓ |
| Toggle comment | Ctrl + / | ⌘ + / |
My Experience: At first, I thought “memorizing shortcuts is troublesome,” but once I learned just Ctrl + S (save) and Ctrl + B (toggle sidebar), mouse operations decreased dramatically and it became comfortable.
7 Recommended Extensions for Beginners
The true value of VSCode lies in its extensions. Here are some useful extensions.
Important: When installing extensions, always verify the correct publisher. There have been actual incidents of fake extensions being distributed, posing security risks (details explained after the table).
| Extension Name | Purpose | Recommended Points | Usage/Setup |
|---|---|---|---|
| Prettier - Code formatter | Auto-format code | Automatically beautifies code on save. Automates indentation and line break unification, improving readability | 1. After install, open settings with Ctrl + ,2. Search for “Format On Save” and check |
| Live Server | Live preview HTML files in browser | Browser auto-refreshes when files are saved. Essential for those learning HTML and CSS | Right-click HTML file → Select “Open with Live Server” |
| Markdown All in One | Markdown syntax support | Convenient for blog posts and document creation. Ctrl + B for bold, Ctrl + I for italic, Ctrl + Shift + V for preview | Ready to use immediately after installation |
| Auto Rename Tag | Auto pair edit HTML tags | When you change the opening tag, the closing tag changes automatically. Makes tag modification incredibly easy | Feature activates automatically after installation |
| Code Spell Checker | Spell checking | Detects English word spelling errors in real-time. Shows mistakes with wavy underlines | Ready to use immediately after installation |
| GitLens | Enhanced Git features | See who changed code and when, line by line. Especially valuable in team development | Git information displays on code after installation |
| indent-rainbow | Color-coded indentation display | Colors change by indentation level, making nested structures visually easier to understand | Automatically color-coded after installation |
⚠️ About Extension Security
In April 2025, malicious software disguised as VSCode extensions was confirmed, with a fake Prettier being downloaded nearly 1 million times. When installing extensions, always pay attention to the following:
Checkpoints for Safe Installation:
| Check Item | Details | Example (for Prettier) |
|---|---|---|
| Verify Publisher (Critical) | Confirm correct publisher identifier | esbenp.prettier-vscode(The fake had publisher name “prettier”) |
| Download Count | Millions of downloads as a guideline | Over 30 million |
| Check Reviews | Are there many positive reviews? | Confirm content is natural and specific |
| Last Updated Date | Is it regularly updated? | Be cautious if too old or too new |
Correct Publishers for Extensions Introduced in This Article:
- Prettier →
esbenp.prettier-vscode - Live Server →
ritwickdey.LiveServer - Markdown All in One →
yzhang.markdown-all-in-one - Auto Rename Tag →
formulahendry.auto-rename-tag - Code Spell Checker →
streetsidesoftware.code-spell-checker - GitLens →
eamodio.gitlens - indent-rainbow →
oderwat.indent-rainbow
Other Precautions:
- Install only the minimum necessary extensions (5-7 is sufficient initially)
- Check the permissions required during installation
- Confirm official documentation or GitHub repository is available
Practice: Creating an HTML File
Let’s not just learn theory but actually try it. Let’s create a simple HTML file.
Step 1: Open Folder
- Select “File” → “Open Folder” in VSCode
- Create a new folder for work (e.g.,
vscode-practice) and select it - Click “Select Folder”
Tip: The basic approach in VSCode is to work by “folder.” Managing projects by separate folders makes organization easier.
Step 2: Create New File
- In the Explorer sidebar, click the “New File” icon next to the folder name
- Enter the filename as
index.htmland press Enter
Step 3: Write Code
Try typing the following code. Type ! and press Tab to auto-generate an HTML template (Emmet feature).
<!DOCTYPE html>
<html lang="en">
  <head>
    <meta charset="UTF-8" />
    <meta name="viewport" content="width=device-width, initial-scale=1.0" />
    <title>VSCode Practice</title>
  </head>
  <body>
    <h1>Created with Visual Studio Code</h1>
    <p>This is my first HTML file.</p>
  </body>
</html>
Step 4: Save File
Save with Ctrl + S (Mac: ⌘ + S).
Step 5: View in Browser
Using Live Server: Right-click the file → Select “Open with Live Server” and the browser opens automatically.
Without Live Server: Double-click the file directly from Explorer to open it.
Writing Blog Posts in Markdown
Let me introduce what I usually do. I write this blog’s articles with VSCode too.
Creating a Markdown File
- Create a new file:
article.md - Try writing Markdown like this:
# How to Use VSCode

## Installation Method

VSCode can be downloaded from the official site.

### For Windows

1. Access the official site
2. Download the installer
3. Follow instructions to install

## Useful Features

- Code completion
- Syntax highlighting
- Git integration
Preview Display
Press Ctrl + Shift + V (Mac: ⌘ + Shift + V) to display the preview.
To display editing screen and preview side by side: Press Ctrl + K V (Mac: ⌘ + K V) and the preview appears on the right.
My Method: When writing blog posts, I edit Markdown on the left while checking the preview on the right. This method allows real-time confirmation of formatting, making it efficient.
Related Article: For those who want to know more about Markdown syntax, see “Markdown Guide & Cheat Sheet.” We comprehensively cover everything from basic syntax to practical considerations.
Common Troubles and Solutions
| Trouble | Solution Steps | Notes/Recommended Settings |
|---|---|---|
| Japanese input is strange (Characters before confirmation display twice) | 1. Open settings with Ctrl + ,2. Type “ime” in search bar 3. Turn off “Render Control Characters” | Windows-specific issue. This setting often resolves it |
| VS Code is slow | 1. Disable/uninstall unnecessary extensions 2. Open command palette with Ctrl + Shift + P and run “Developer: Reload Window”3. Exclude large folders (node_modules, etc.) from workspace 4. Open settings with Ctrl + , and exclude unnecessary files in “Files: Exclude” | Too many extensions slow it down. Keep only what’s truly needed (5-7 is a good guideline) |
| VS Code won’t start/ Forces quit | 1. Completely close and restart VS Code 2. Disable or uninstall extensions that might be causing problems 3. Reset settings file: Back up user data, then delete or rename settings file and launch VS Code 4. Reinstall VS Code (last resort) | Often caused by specific extensions. Always back up before step 3 |
Author’s Use Cases
I use VSCode for the following purposes:
| Use Case | Features/Extensions Used | Work Points |
|---|---|---|
| Blog Post Writing (Markdown) | ・Markdown All in One ・Code Spell Checker ・Preview feature | Edit on left, check preview on right while writing. Spell check prevents mistakes |
| HTML and CSS Coding | ・Live Server ・Prettier ・Auto Rename Tag | Real-time preview with Live Server. Auto-format with Prettier maintains readability |
| Version Control with GitHub | ・Source Control (built-in) ・GitLens | Commit and push complete within editor. Check change history with GitLens |
| Simple Python Script Creation | ・Python extension ・Integrated terminal | Efficient writing with code completion. Immediate execution and debugging in terminal |
Stumbling Points and Solutions
| Stumbling Point | Solution | What I Learned |
|---|---|---|
| Opening files only without opening folders | Always use “Open Folder” to manage by project unit | Could now benefit from project management (search, Git integration, etc.) |
| Added too many extensions, became slow | Keep only truly necessary extensions (5-7 is enough initially) | Could now use necessary features while maintaining smooth operation |
2025 New Feature: AI Integration
In 2025, VSCode has significantly enhanced AI-powered development support features. The “GitHub Copilot” extension in particular is widely used from programming beginners to advanced users.
Main Features of GitHub Copilot
| Feature | Description | Benefits for Beginners |
|---|---|---|
| Code Completion | Predicts and suggests next code from input | Even without memorizing syntax, generates code from natural language descriptions |
| Next Edit Suggestions | Predicts next editing location from current editing content | Editing work becomes smooth, improving work efficiency |
| Agent Mode | When tasks are delegated, AI automatically searches, edits, and executes files | Complex operations can be delegated to AI, allowing practice while learning |
| Chat Feature | Responds to code explanations and questions in natural language | Can ask questions about unknown code on the spot |
Advice for Beginners
GitHub Copilot is a very powerful tool, but we recommend getting familiar with basic features first before using it. The reasons are as follows:
- Without understanding basic syntax and logic, you can’t judge if AI suggestions are correct
- Writing yourself helps you learn programming thinking
- Free plan has a limit of 60 times per month (free for students)
When to Start Using:
- After learning basic HTML or Markdown syntax
- After becoming able to write simple code yourself
- When you feel “I want to write more efficiently”
GitHub Copilot is available for $10 per month (free for students and educators). If interested, trying the free trial first is also good.
Summary
VSCode is a highly functional code editor that’s hard to believe is free. At first, the many features may be confusing, but once you learn the basic usage, work efficiency improves dramatically.
3 Steps to Start Today:
- Install VSCode and set it to Japanese
- Memorize just 3 shortcuts (save, toggle sidebar, command palette)
- Create one simple HTML file
You don’t need to aim for perfection from the start. If you learn features gradually as you use it, it will naturally become familiar.
I also thought “Isn’t Notepad enough?” at first, but now I can’t imagine working without VSCode. I hope you’ll also make use of this convenient tool.
Reference Links
- Visual Studio Code Official Site
- VSCode Official Documentation (Japanese)
- VSCode Extension Marketplace
- Emmet Cheat Sheet
- VSCode Keyboard Shortcuts List (Official PDF)
I hope this article helps you get started with VSCode. If you have questions, try asking in the official documentation or community. VSCode users are often kind, so they’ll surely help you.