· FabLab Westharima Team · Documentation · 5 min read
Complete Guide to Building Beautiful Documentation Sites with MkDocs + Material | Beginner-Friendly
Build beautiful documentation sites from Markdown using MkDocs + Material theme. A practical guide covering everything from installation to customization and GitHub Pages deployment.
Complete Guide to Building Beautiful Documentation Sites with MkDocs + Material | Beginner-Friendly
How do you publish your project documentation? With MkDocs + Material theme, you can create beautiful documentation sites with search functionality using only Markdown.
This article provides a practical guide to using MkDocs, covering everything from installation to customization and deployment.
Where MkDocs Excels
MkDocs is particularly powerful for these use cases:
- Personal project documentation - Add beautiful documentation sites to your GitHub projects
- Technical knowledge base / Internal wiki - Organize technical information shared within teams
- Official documentation for open source projects - Adopted by many prominent projects
- Learning records / Portfolio sites - Visualize your technical growth journey
- Learning programs like Fab Academy - Ideal for weekly reports and assignment submissions
What is MkDocs?
MkDocs is a static site generator particularly suited for creating software development documentation. You can write content in Markdown and build project documentation websites while previewing in real-time.
MkDocs Key Features
| Feature | Description |
|---|---|
| Content Creation with Markdown | Converts Markdown files to HTML to create websites. Easy to learn and familiar to many developers |
| Themes and Customization | Rich selection of pre-built themes with customization options. Supports custom theme creation |
| Automated Site Building | Single build command generates and updates sites. Makes documentation maintenance easy |
| Real-time Preview | Local hosting with serve command. Live reload feature instantly reflects changes in browser |
| Integrated Search | Full-text search functionality built-in by default. End users can easily search for needed information |
| Plugin System | Plugin system supporting extensions. Allows adding features or modifying behavior to suit specific needs |
System Requirements
The procedures in this article work on the following environments:
- macOS: 10.15 or later (Intel/Apple Silicon compatible)
- Windows: Windows 10/11
- Linux: Major distributions
- Python: 3.8 or later
- pip: Bundled with Python 3.8 or later
Note: For macOS, installation using Homebrew is recommended. For Windows, download the installer from the official Python website.
MkDocs Installation Steps
Please follow the steps below according to your OS.
For macOS
1. Install Homebrew (if not already installed)
First, install Homebrew for package management on Mac.
/bin/bash -c "$(curl -fsSL https://raw.githubusercontent.com/Homebrew/install/HEAD/install.sh)"For details, see the Homebrew official site.
2. Install Python and pip
Install Python using Homebrew (pip will be installed together).
brew install pythonVerify installation:
python3 --version
python3 -m pip --version
3. Install MkDocs
Install MkDocs using pip.
python3 -m pip install mkdocsVerify installation:
mkdocs --versionFor Windows
1. Install Python
Download the latest Python 3.x installer from the Python official site.
Important notes during installation:
- Important: Be sure to check “Add Python to PATH”
- Click “Install Now” to install
2. Verify Installation
Open Command Prompt or PowerShell and verify:
python --version
python -m pip --version
3. Install MkDocs
python -m pip install mkdocsVerify installation:
mkdocs --versionFor Linux
1. Install Python and pip
Many Linux distributions come with Python 3 pre-installed, but let’s verify.
Ubuntu/Debian-based:
sudo apt update
sudo apt install python3 python3-pip
Fedora/RHEL-based:
sudo dnf install python3 python3-pipArch Linux:
sudo pacman -S python python-pip2. Verify Installation
python3 --version
python3 -m pip --version
3. Install MkDocs
python3 -m pip install --user mkdocsNote: Using the --user option installs to the user directory (avoids permission errors).
Verify installation:
mkdocs --versionIf the path is not set, add the following to ~/.bashrc or ~/.zshrc:
export PATH="$HOME/.local/bin:$PATH"Let’s Get Your First Site Running
Once installation is complete, let’s verify it works.
mkdocs new mysite      # Create new MkDocs project (mysite folder)
cd mysite              # Move to created directory
mkdocs serve # Start local preview server (preview at http://127.0.0.1:8000)- After starting the local server: Open http://127.0.0.1:8000 in your browser to view the local site.
- To stop the local server: Press Ctrl + C in the terminal.
Installing the Material Theme
MkDocs provides various themes, allowing you to easily customize your documentation’s appearance.
This article uses the most popular Material for MkDocs theme. Material for MkDocs offers beautiful design based on Google Material Design and rich features.
Theme List
If you want to explore other themes, refer to the MkDocs Themes list.
Installing the Material Theme
You can easily install it using pip. Execute the following command according to your OS.
macOS / Linux:
python3 -m pip install mkdocs-materialIf you get a permission error on Linux, add the --user option:
python3 -m pip install --user mkdocs-materialWindows:
python -m pip install mkdocs-materialEditing mkdocs.yml (MkDocs Customization)
MkDocs customization is done in the mkdocs.yml file at the project root.
Basic Configuration
Let’s start with minimal settings.
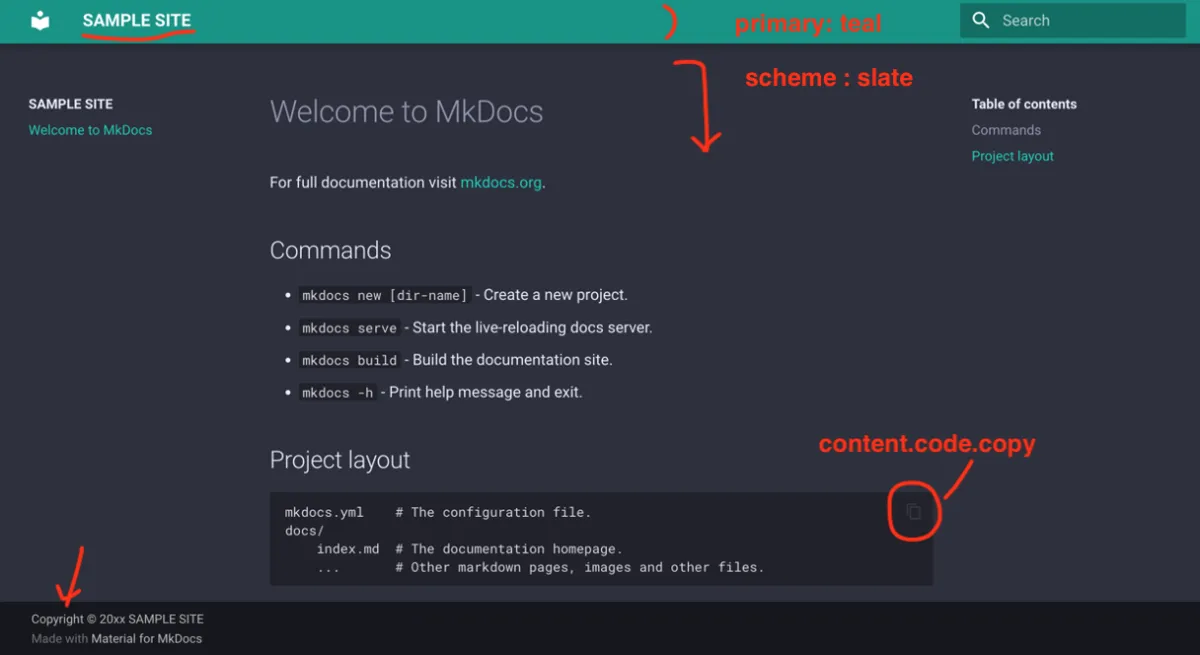
site_name: SAMPLE SITE

site_dir: 'public'

theme:
  name: material

  features:
    - content.code.copy

  palette:
    primary: teal
    scheme: slate

# Copyright
copyright: Copyright © 20xx SAMPLE SITE
Customized Site
Common Customization Examples
1. Add Dark Mode Toggle Button
theme:
  palette:
    # Light mode
    - media: '(prefers-color-scheme: light)'
      scheme: default
      primary: indigo
      toggle:
        icon: material/brightness-7
        name: Switch to dark mode
    # Dark mode
    - media: '(prefers-color-scheme: dark)'
      scheme: slate
      primary: indigo
      toggle:
        icon: material/brightness-4
        name: Switch to light mode
2. Color Palette Configuration
The Material theme provides a rich color palette.
Available colors:
red, pink, purple, deep purple, indigo, blue, light blue, cyan, teal, green, light green, lime, yellow, amber, orange, deep orange, brown, grey, blue grey, black, white

Configuration example:
theme:
  palette:
    primary: teal # Header and link colors
    accent: indigo # Button and highlight colors
You can freely customize according to your project’s brand colors.
3. Navigation Configuration
nav:
  - Home: index.md
  - Getting Started: getting-started.md
  - Tutorial:
      - Basics: tutorial/basics.md
      - Advanced: tutorial/advanced.md
  - Reference: reference.md
These settings enable you to build a more user-friendly and attractive documentation site.
MkDocs Basic Commands
mkdocs new mysite     # Create new project
cd mysite             # Move to directory
mkdocs serve          # Local preview (http://127.0.0.1:8000)
mkdocs build # Build HTMLNote: To stop the running server, press Ctrl + C
Editing Text
To edit content, add and edit files (extension: *.md).
Example:
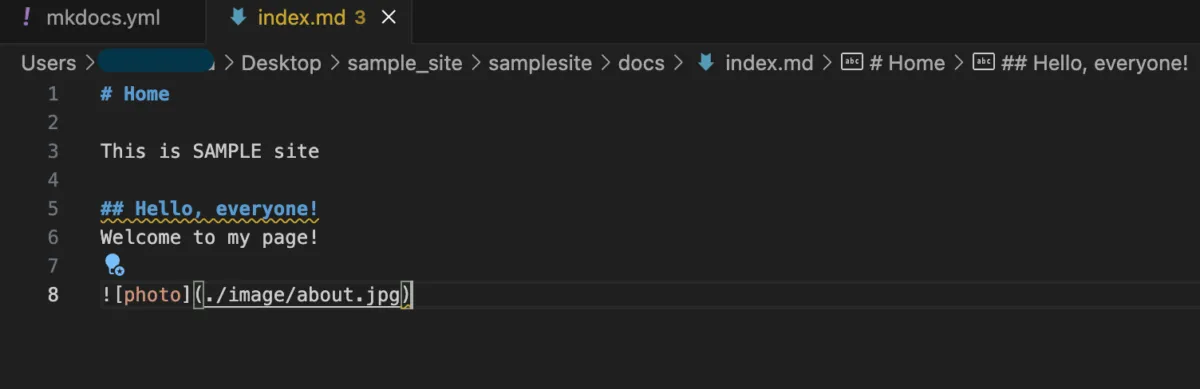
Site After Text Editing

Publishing on GitHub Pages (Complete in 3 Minutes)
You can publish your created documentation site for free on GitHub Pages.
1. Create GitHub Repository
Push your project to GitHub.
git init
git add .
git commit -m "Initial commit"
git remote add origin https://github.com/username/repository-name.git
git push -u origin main
2. Deploy to GitHub Pages
MkDocs provides a dedicated deployment command.
mkdocs gh-deployThis single command pushes the built site to the gh-pages branch and automatically publishes it.
3. Verify Published URL
After a few minutes, your site will be published at:
https://username.github.io/repository-name/You can also set up automatic deployment on push to the main branch using GitHub Actions.
Common Errors
Common errors during deployment to GitHub Pages and their solutions:
remote origin not found: Rungit remote add originto add the remote repositoryPermission denied (publickey): You need to register an SSH key with GitHub. Refer to the GitHub SSH setup guide
![[Unix Systems] [chmod] What are Permissions? Specifying Permissions Numerically](/_astro/mkdocs_material_guide_eyecatch.DfbB4An5.png)